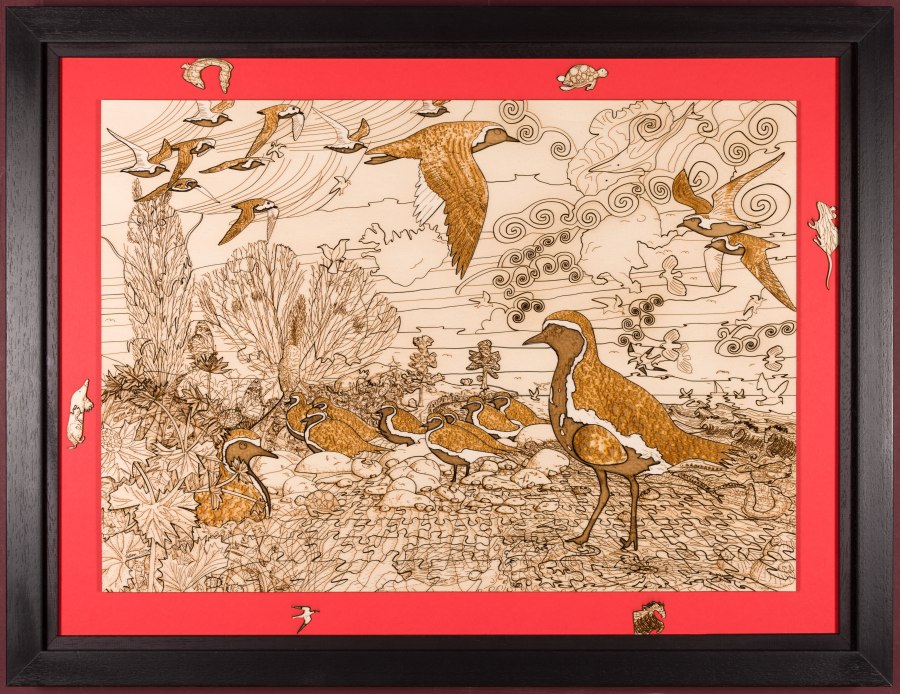

Title: “Golden Plover with Egg (Art Puzzle) – Laser”
Artist: Michael Autumn
Medium: Hand-drawing – laser cut & engraved
Giclée archival laser cut & engraved on 6mm AB/AB Italian Panguaneta Poplar plywood (produced responsibly, sustainably, and to the highest of standards), child-safe, moisture-repelling, varnish
Size: 39.0cm (W) x 55.1cm (H), framed 69.5cm x 53.2cm
Edition: Limited Edition of 101 – individually signed and numbered, and museum-level preserved and bespoke framed; and Unlimited Edition, lasered signature, unframed.
Date: 02/2024
N.B.: The cut-outs in the frame above are to draw attention to the fact that the artwork is a wooden puzzle. – otherwise it could be mistaken for a simple drawing…
The art of simply burning wood with light
This is an attempt to create high quality art using the medium of simply burning wood with light – and nothing else. From the concept of a magnifying glass burning paper, technology has progressed enormously to the modern day laser – where a beam of light can be very finely controlled in terms of intensity and speed of movement. Where sophisticated software can very precisely translate vector- and pixel-based drawings into computer-controlled movement of a laserbeam over your chosen material. But there is a real art to doing this successfully…
I was hoping to create a mass-produceable wooden laser cut & engraved version of my 40mm thick solid oak “Golden Plover with Egg (Art Puzzle)”

(see https://michaelautumn.wordpress.com/2020/07/30/golden-plover-with-egg-jigsaw-puzzle/) because hand-cutting the latter took far too long and caused serious RSI and/or rheumatoid arthritis in my hands/fingers. But in order to achieve the quality I wanted, it turns out (after considerable effort!) that mass-production is simply not possible. It has been a long journey to get to a standard I’m happy with. Along the road I have researched a great deal about materials, wood, lasers (obviously! – but this is a big topic…), and lasering techniques. I have developed some of my own techniques and built some special tools because there were clear limitations in the best techniques, tools, and materials available. Suffice to say, I haven’t come across any individual or company who can produce my designs to the quality I do. But it comes at a significant cost. I can only produce one per day – so in any definition of the phrase mass production, this definitely is not!
Putting aside the weeks it took me to complete the design (in addition to the weeks it took me to design the original, I spent about another four weeks enhancing it to take advantage of laser capabilities) – and may trials, adjustments, custom tooling, and more trials…
The design uses multiple lasering and layering techniques – cut-throughs, scoring, light scoring, engraving, deep engraving – which all have to be done in a specific sequence. For example, in places in the design, I have score marks on top of some deep engraved areas – so obviously the deep engraving has to be done before the scoring.

Detail showing a mix of cut lines, scoring, light scoring, and different types of engraving.
Also, I use the flattest, smoothest, least porous, best quality plywood I can (and do special preparations to achieve this – see below) – so I can achieve the subtle effects I’m looking for with the minimum of laser power (basically more power equals less precision).
In this artwork I particularly wanted to reproduce, using light-burning alone, what is for me the three important colours of the golden plover in its magnificent summer plumage: the white fringe to their mainly black bellies, and especially the golden tones of their back – from where they get their name. So what is white in terms of lasering wood? It’s the absence of any burning and scorch marks on very pale, smooth, wood. But the crux of the matter is avoiding getting any discolouration/contamination in these areas – especially as they are sandwiched between very dark areas. It’s very hard to control smoke and scorch marks with lasers. It’s like the challenge of white in watercolour painting – where the white areas are usually the colour of the paper itself, the absence of paint – and in detailed areas masking is often used to exclude surrounding colour seeping into where it is not wanted.
These are the steps :-
- Spray water on the raw plywood panels to raise the grain, let them dry.
- Very fine (400 grit) orbit sand the dry plywood, wipe clean.

- The plywood panels are then varnished and left to dry for up to three days (depending on time of year – humidity and temperature). This is to minimise the effects of laser burning and makes it easier to clean specific areas afterwards (see step 8).

- The plywood panels are then flattened in a special press for several days.

- A single plywood sheet is put in a custom-made flat panel laser bed holder (I designed).
- The lasering itself takes a little over five hours on my 130W CO2 laser (for a single artwork). I do it in two steps because I find the results are better. Clean the “white” engraved areas (which I want as pale as possible) after engraving the “golden” areas – and before doing the black areas, scoring, and cuts.
Step 1 – the “golden” areas. The following two images show the “golden” engraved areas before and after cleaning :-

Step 2 – the black engraving, scoring, and cuts. - After lasering, I do a detailed quality check. Wood, being organic with glued layers, varies from sheet to sheet – and some lasered artwork doesn’t make the grade – or needs fixing in some way.
- Then very carefully lighten the brightest/whitest, most important areas (that have been darkened by smoke) with cotton swabs and a mild acid – to make them stand out better. This seems very much like an art-restoration process – like removing the old varnish from an old masterpiece – to restore the original colours! (But I only do certain areas to make them stand out – not the whole thing.) This takes me about an hour and a half. The difference is subtle, but vital to me. It is the difference between a mechanically produced piece of art and a true piece of art I’m happy with.

The following two images show before and after selected cleaning (notice how the white margins of the golden plovers stand out better after this second cleaning) :-

- The artwork then gets a final varnishing and left to dry for up to three days. This is especially important to protect the newly exposed wood surfaces.
- I use pyrography to number each piece in the limited edition.

- The special display mounts – with a selection of pieces cut of in order to highlight the work is in fact a puzzle – and not simply a drawing – are individually laser cut out of high quality mount board. This takes my precision laser about 40 minutes.

- Finally I frame the artwork to using museum materials and techniques. I use anti-reflective, 99% UV filtering, ultra clear museum-grade glass to provide maximum protection to the piece.

I think the final work shows that lasers can be used to make real art – and are capable of very fine control – as much as lithographic printing, silk-screen printing, wood-block printing, lino-printing. Like any tool, the best results come with experience, knowledge, perseverance, patience, and finding ways around the natural limitations of the medium…


